How to connect and use Ramus from Goose
Add Ramus to Goose as a remote extension so it can run your APK on a cloud Android device, check a flow and send you a link to share.
GoosePublished
On this page
This guide is for developers who build Android apps with Goose, the open-source agent that started at Block and now lives in the Agentic AI Foundation. It covers the Goose CLI and Goose Desktop. At the end, Goose can start a cloud Android device, install your APK, check a flow and send you a link, so you or a reviewer can watch the device. You take over from your device page.
What you need
- Goose 1.46 or later, CLI or Desktop. Earlier versions cannot finish the
Ramus sign-in.
goose --versionshows the CLI's version andgoose updateupgrades it. - A model provider set up in Goose, with a model that can call tools.
- A Ramus account, which you sign in to with GitHub. An anonymous trial from
ramus trialcannot sign in to the MCP server. - An Android project you can build locally, such as a Gradle app that produces
app/build/outputs/apk/debug/app-debug.apk. - Node.js 22 or later, if you also want the
ramusCLI.
Connect Ramus
Goose calls MCP servers extensions. Ramus is a remote one at
https://api.ramus.dev/api/mcp, and Goose talks to it over Streamable HTTP.
Goose signs in to it with your Ramus account, so there is no key to copy.
Add the extension from the CLI
Run goose configure, choose Add Extension, then Remote Extension
(Streamable HTTP), and answer the prompts:
- Name:
ramus. - Endpoint URI:
https://api.ramus.dev/api/mcp. - Timeout:
300seconds. - Description: anything, such as
Cloud Android devices. - Custom headers: No.
Answer No to custom headers, because Goose signs in instead. The result is an entry like this one, which you can also write by hand:
extensions:
  ramus:
    enabled: true
    type: streamable_http
    name: ramus
    description: Cloud Android devices
    uri: https://api.ramus.dev/api/mcp
    timeout: 300
Keep the timeout at 300 seconds, the Goose default. android_start_session and
android_install_app can wait up to 50 seconds for a device or an install.
Add the extension in Goose Desktop
Open the sidebar, click Extensions, then Add custom extension. Set
Type to Streamable HTTP, Extension Name to ramus, Endpoint to
https://api.ramus.dev/api/mcp and Timeout to 300, then click Add.
Leave Request Headers empty.
Goose Desktop also installs extensions from a link. Opening this one on a machine with Goose Desktop adds the same extension:
goose://extension?url=https%3A%2F%2Fapi.ramus.dev%2Fapi%2Fmcp&type=streamable_http&id=ramus&name=ramus&description=Cloud%20Android%20devices&timeout=300
Sign in with Ramus
Start a session with goose session, or open a new chat in Goose Desktop. When
Goose starts the extension, Ramus asks for a sign-in, and Goose opens your
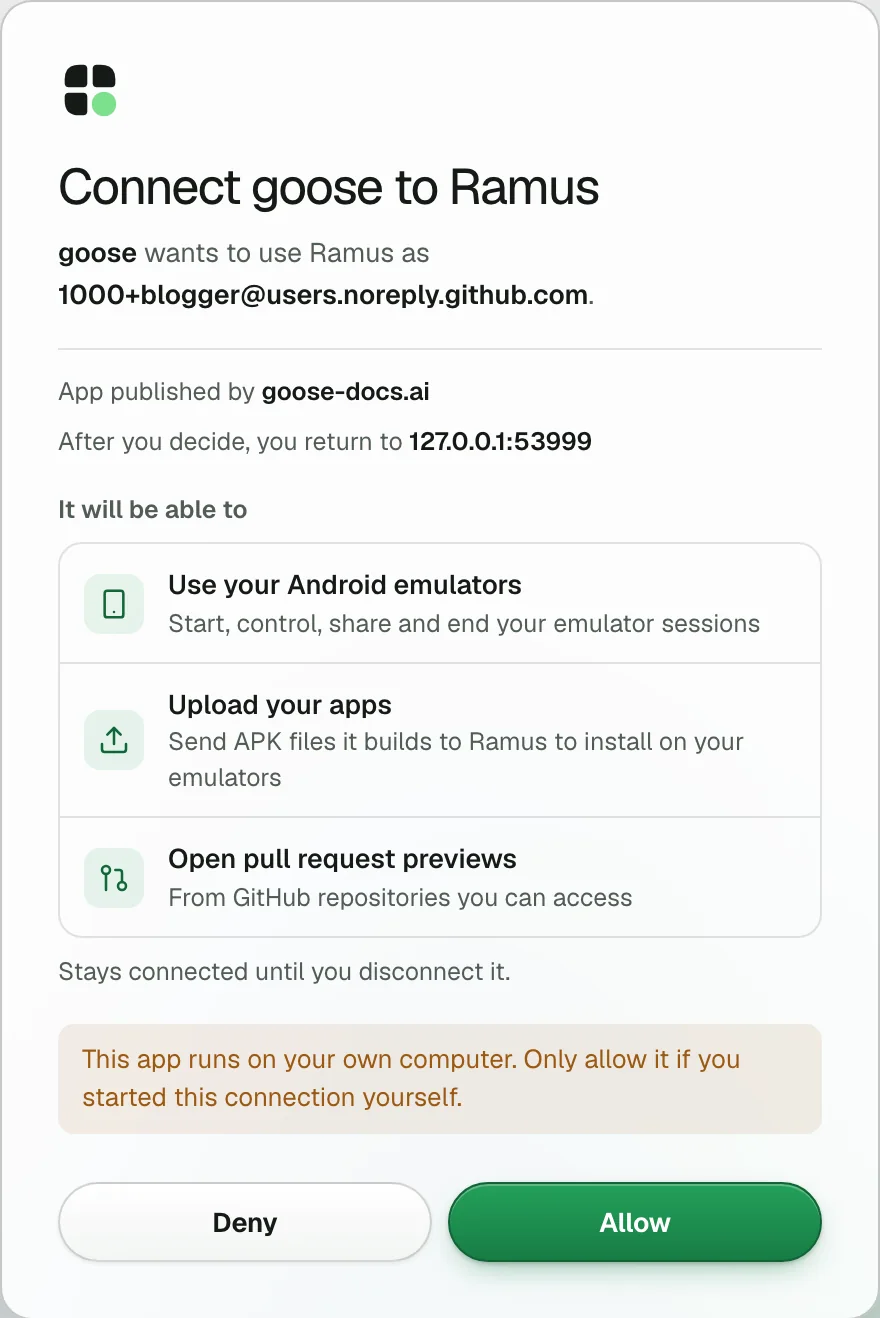
browser at Ramus's consent page, Connect goose to Ramus, which says the app
is published by goose-docs.ai and runs on your own computer. Sign in with GitHub
if Ramus asks and choose Allow.
If no browser opens, the Goose CLI prints the sign-in address. Goose waits five minutes for you to finish, then stores the tokens and refreshes them, so you sign in once.
Or use an API key
If you cannot sign in from a browser on this machine, use a key instead. Create
one on the Agents page, tab API key. Goose
expands ${VAR} in a header value from the variables the extension lists in
env_keys, so the key stays out of config.yaml:
extensions:
  ramus:
    enabled: true
    type: streamable_http
    name: ramus
    description: Cloud Android devices
    uri: https://api.ramus.dev/api/mcp
    env_keys:
      - RAMUS_API_KEY
    headers:
      Authorization: Bearer ${RAMUS_API_KEY}
    timeout: 300
Goose looks for RAMUS_API_KEY in its own environment first, then in its secret
store, the system keychain. For the CLI, export the variable in the shell you
start Goose from. In Goose Desktop, add RAMUS_API_KEY under Environment
Variables in the extension dialog, which saves it to the secret store, and
Authorization with the value Bearer ${RAMUS_API_KEY} under Request
Headers.
Check the connection
When you start goose session, a Ramus extension that fails to load shows up
before your first prompt as a line starting ⚠ Failed to start extension 'ramus'. goose info -v lists your enabled extensions. In Goose Desktop, the
Extensions page shows ramus switched on. Goose names each tool after its
extension, such as ramus__android_snapshot, and lists them if you ask "Which
Ramus tools do you have?"
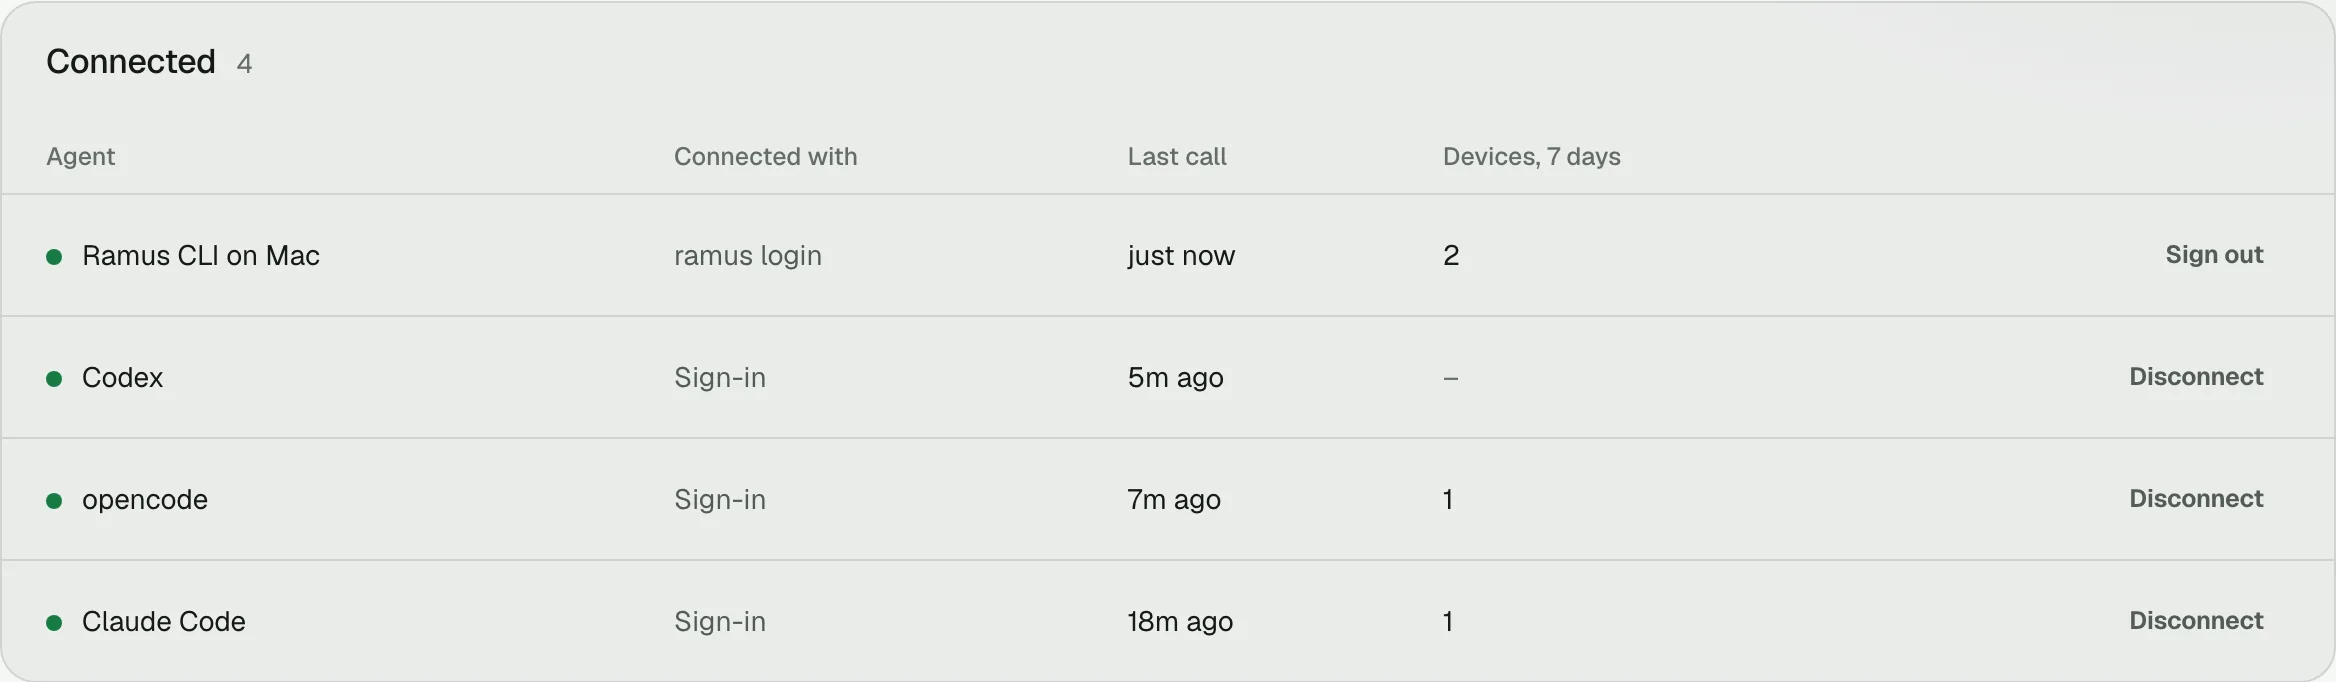
Then open ramus.dev/agents. After Goose's first tool call, goose appears under Connected, with Sign-in (or your API key's name) and the time of its last call. Disconnect or Revoke on that row cuts it off.
Add the CLI and the skill
The Developer extension, on by default, gives Goose a shell tool, so Goose can
also run the ramus CLI. The CLI does a few things MCP cannot: it uploads and
installs a local APK in one command, opens an adb tunnel (ramus adb) and runs
the hot-reload loop (ramus dev). Install it and sign in yourself:
npm i -g ramus-cli
ramus login
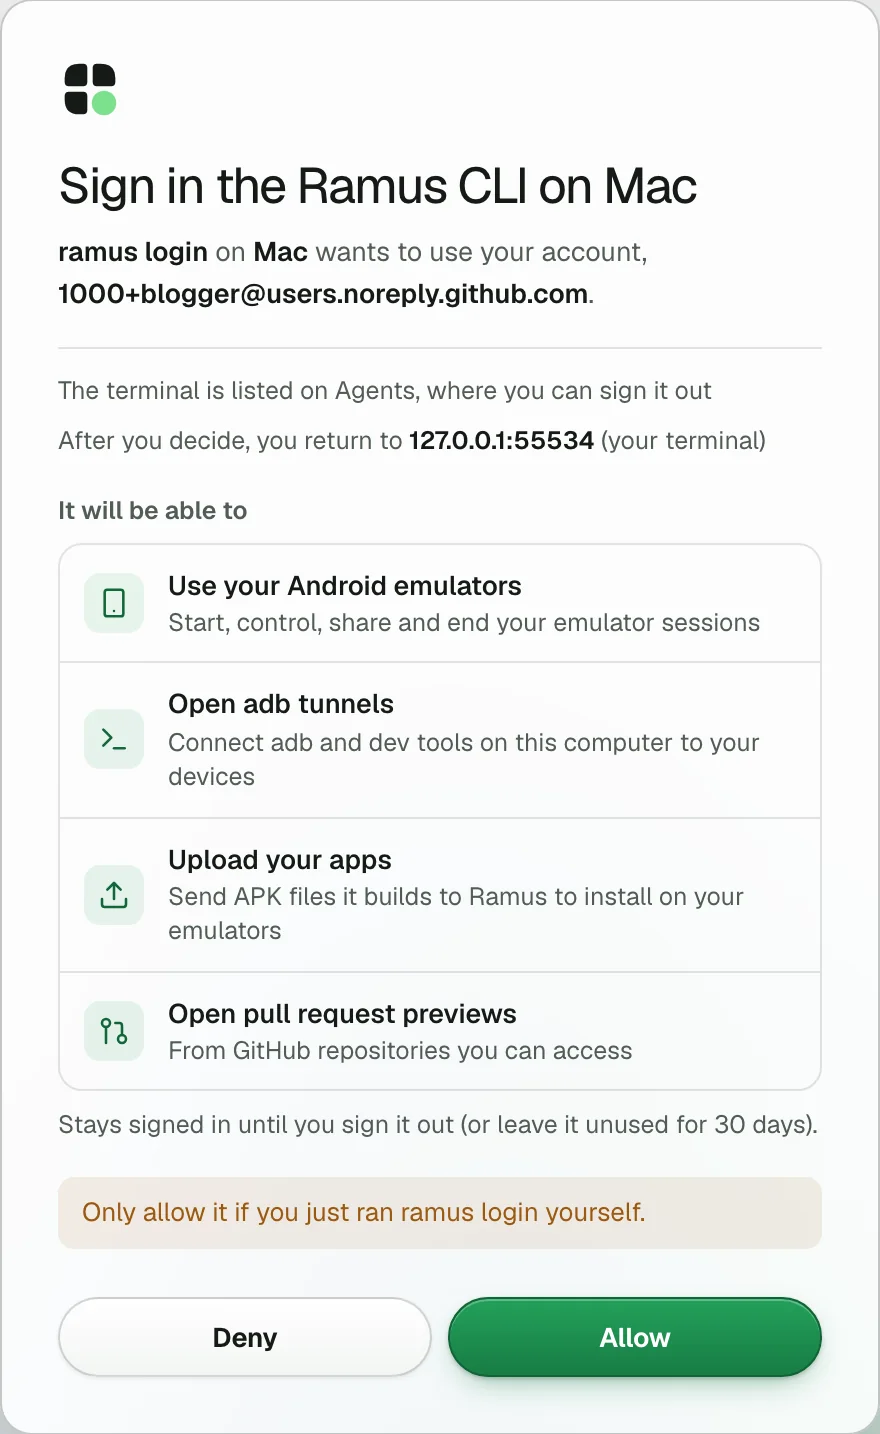
ramus login opens your browser. Check that the page names your machine and
choose Allow. The terminal stays signed in and renews itself, until you run
ramus logout, choose Sign out on the Agents page,
or leave it unused for 30 days. Over SSH it gives you a code to approve on any
device. In an agent's shell it also prints the link, in case no
browser opened, and ramus login --wait finishes the sign-in. ramus status shows who you are signed in as. RAMUS_API_KEY in the environment wins over the sign-in.
The android-use skill teaches Goose the Ramus loop. Goose loads skills from
.agents/skills/ in your project and from ~/.agents/skills/:
mkdir -p .agents/skills/android-use
curl -fsSL https://ramus.dev/skill.md -o .agents/skills/android-use/SKILL.md
Goose picks the skill when a task matches it. In the CLI, /skills android-use
loads it by name. Goose also reads skills from .claude/skills/, so a copy your
team saved for Claude Code works too.
For context that is always on, add one line to AGENTS.md. Goose reads
AGENTS.md and .goosehints from your working directory up to the repository
root:
Test Android changes on Ramus: https://ramus.dev/agents.md
MCP or CLI
Both reach the same devices on the same account. This guide follows MCP: Goose
calls typed tools and gets screenshots back as images. Use the CLI for adb and
ramus dev. If both are set up, tell Goose which one to use.
Goose's docs say it works best with fewer than 25 tools enabled in total, and
Ramus brings 24. If you only use the CLI, switch the Ramus
extension off. If you use MCP, load only the tools the test loop needs by adding
available_tools to the ramus entry:
    available_tools:
      - android_start_session
      - android_session_status
      - android_list_sessions
      - android_upload_apk
      - android_install_app
      - android_snapshot
      - android_screenshot
      - android_tap
      - android_type
      - android_swipe
      - android_press
      - android_wait_for
      - android_logcat
      - android_app_launch
      - android_share_session
      - android_list_feedback
      - android_get_feedback
      - android_resolve_feedback
      - android_end_session
Share the setup as a recipe
A Goose recipe bundles instructions, a prompt and extensions in one file your
team can run. When a recipe lists extensions, it gets only those, so include
developer for the build:
version: "1.0.0"
title: Check an Android flow on Ramus
description: Build the debug APK, run it on a Ramus device and check one flow.
instructions: |
  Test Android changes on Ramus (https://ramus.dev/agents.md). Build the APK
  with the project's own tooling. Send the watch link as soon as you have it.
  On failure, take a screenshot and read logcat before changing anything.
prompt: |
  Build the debug APK, install it on a Ramus device and check this flow: {{ flow }}
parameters:
  - key: flow
    input_type: string
    requirement: required
    description: The flow to check, in plain words
extensions:
  - type: platform
    name: developer
  - type: streamable_http
    name: ramus
    description: Cloud Android devices
    uri: https://api.ramus.dev/api/mcp
    timeout: 300
Run it with
goose run --recipe android-check.yaml --params flow="sign in and reach Welcome" --interactive.
Start a device
Goose runs in Autonomous mode by default, so it calls Ramus tools without asking. Start with the demo app:
Start a Ramus Android device with the demo app and send me a link to watch it.
Goose calls android_start_session with demo: true. The tool waits until the
device is live, then returns the session id, a watch_url for you, the minutes
left this month on plans with a monthly allowance, and a screenshot. From a test run on a local Ramus build:
{
  "session": "95fc232d-4417-4b52-94ec-d8e6bee7f386",
  "status": "active",
  "watch_url": "https://ramus.dev/share#rshr_…",
  "next": "the screenshot below is the device now. Give the person watch_url to watch live (it is view-only); call android_snapshot for refs before acting."
}
Open the watch link to see the device live in your browser. You can tap and type on it yourself while Goose works.
Install your app
To run your own build, Goose puts the APK on Ramus first. Over MCP that is two tool calls and one command:
android_upload_apkwith the file name returns anapk_uriand a readycurlcommand, valid for 15 minutes.- Goose runs the
curlcommand with itsshelltool and the APK's path. No output means the upload worked. - It passes the
apk_uritoandroid_install_appto install on the device that is already running, or toandroid_start_sessionto start a new one.android_install_appinstalls in place and opens the app. The device and your watch link stay connected.
Build the debug APK with ./gradlew assembleDebug, upload it to Ramus and install it on the device that is running.
With the CLI the same step is one command. To start a new device from the APK:
$ ramus session start --apk app/build/outputs/apk/debug/app-debug.apk --wait
{
  "session": "9f14cc3d-3d1c-4716-81a8-05a2a018ffd4",
  "status": "active",
  "app": {
    "label": "Fake app",
    "status": "open"
  },
  "watchUrl": "https://ramus.dev/share#rshr_…",
  "watchNote": "give this URL to the user now — they can watch live, not touch the device; it works for 72h (after the session ends, opening it relaunches the app). `ramus session share --permission use` makes a link that can control it",
  "idleTtlSec": 600
}
This output comes from a local Ramus build with a simulated device, whose test
app is named Fake app.
To install a new build on a running device, use ramus session install. Pass
the session id when the device was started over MCP, because the CLI only
remembers devices it started itself:
ramus session install --session <id> app/build/outputs/apk/debug/app-debug.apk
If Ramus already has the app, android_start_session with app set to its
package name skips the upload. Chat-only clients such as ChatGPT take an APK
attached to the message; Goose uploads the file itself.
Let the agent check a flow
Give Goose a concrete flow and tell it what evidence to bring back:
Use the Ramus device. Test sign-in: tap "Sign in", enter reviewer@example.com, tap Continue, and check that the Welcome screen appears. If it fails, take a screenshot and read logcat, fix the bug, rebuild, and install the new APK on the same device. Repeat until the flow passes. Report what you saw with a screenshot, and leave the device running for me.
Goose works in a loop of observe, act and verify:
android_snapshotreturns the screen as elements, each with aref, and a generation number,gen.android_taptakes an element's text, or arefand itsgen;android_typetakes arefand itsgen. Withexpect: "Welcome", a tap fails withexpect_failedwhen that text does not appear, even though the tap landed.- Each action returns the screen it led to, with fresh refs, so Goose decides the
next step from that. An older ref fails with
stale_refinstead of tapping the wrong thing. android_wait_forwaits for text to appear or go, or for the screen to settle.
When a step fails, Goose collects evidence first: android_screenshot returns
the screen as an image, and android_logcat returns the latest log lines,
optionally filtered by the app's package name. Then it fixes the code, rebuilds,
uploads the new APK and calls android_install_app on the same session, while
you keep watching through the same link. After a crash, android_app_launch
brings the app back.
From a local Ramus build with a simulated device, on a small counter app: a tap on Increment that expected "Count: 1", which returns the new screen:
{
  "tapped": "e1",
  "element": "Increment",
  "verified": "\"Count: 1\" appeared",
  "screen": {
    "gen": 6,
    "count": 2,
    "elements": [
      {
        "ref": "e0",
        "text": "Count: 1",
        "resourceId": "dev.sandlot.fake:id/counter",
        "class": "TextView",
        "x": 0.132,
        "y": 0.417,
        "w": 0.735,
        "h": 0.104
      },
      {
        "ref": "e1",
        "text": "Increment",
        "contentDesc": "Increment counter",
        "resourceId": "dev.sandlot.fake:id/increment",
        "class": "Button",
        "clickable": true,
        "x": 0.132,
        "y": 0.625,
        "w": 0.735,
        "h": 0.104
      }
    ],
    "foreground_app": "dev.ramus.fake"
  },
  "next": "refs above are current (gen 6); act on them directly"
}
To see each step before it runs, switch the session to Manual Approval with
/mode approve, or Smart Approval with /mode smart_approve. Then set each
Ramus tool to Always Allow, Ask Before or Never Allow under
goose configure, goose settings, Tool Permission. Reads such as
android_snapshot and android_logcat are safe to allow. Keep
android_start_session, android_share_session and android_end_session on
Ask Before: they use minutes or hand out access.
Share a link
The watch_url from android_start_session is your link. Anyone who opens it
can watch the device, and nothing more, without a Ramus account. It does not
show your name. Do not post it publicly. For a reviewer, ask for a separate link:
Make a Ramus share link for the reviewer that lasts 7 days.
Goose calls android_share_session with ttl_minutes: 10080 and gets back a
share_url and its expires_at. A device can have several links; a new one
leaves the others working. Links last 72 hours by default, up to 7 days, and you
- 3 people can watch at once. After the session ends, opening a link starts the app again on a fresh device, without the old app state, until the link expires or is revoked.
android_share_session with revoke: true revokes every link of the session,
your watch link included. To revoke a single link, use the Share panel on the
device page at ramus.dev. For a link where the reviewer cannot tap or type, ask
for a watch-only link; the agent passes permission: "watch".
When everyone is done, android_end_session frees the device. Ending does not
revoke links, and a session also ends after 10 minutes with no activity. The CLI
equivalents are ramus session share --ttl 7d --permission watch, ramus session share --revoke
and ramus session end.
Give each person their own device
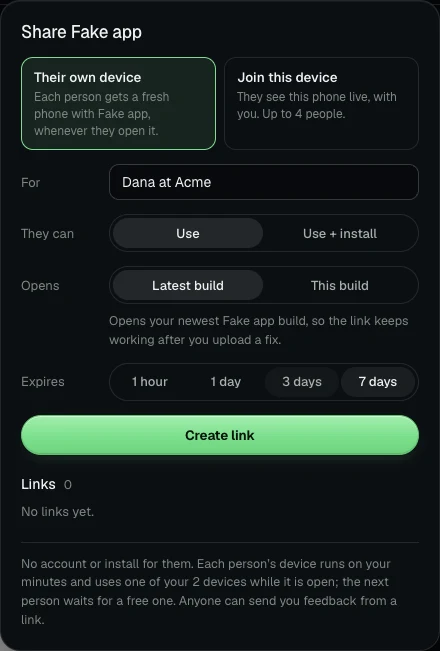
The links above join the device Goose is on. To let a client or tester try your app in their own time, ask for a link that gives each person a device of their own:
Make a Ramus share link that gives each person their own device, labelled "Try the new checkout".
Goose calls android_share_session with own_device: true and label, or
runs ramus session share --own --label "Try the new checkout". Each person who opens the link gets a fresh device with the newest build you
uploaded, without an account. The session must be running an
app you uploaded. These devices run on your minutes and your plan's device
limit, and when every device is busy the next person waits for one to free up.
Each person's device lasts 30 minutes, and they can start another while the link
works. Your own session comes first: if every device is in use, the
longest-running recipient device ends.
Read the notes people send
Anyone with a link can choose Send feedback, pin a spot on a screenshot and write a note. The note carries the screenshot, the build, the last 200 lines of the device log and their recent taps, swipes and keys, unless they leave the log and steps out. Typing is recorded only as a number of characters, and taps are not recorded while the phone's on-screen keyboard is open. Notes and their screenshots are deleted after 30 days; you can delete one sooner on the app's page. Goose can work through them:
Read the open Ramus feedback notes. Reproduce the first one and tell me what you find. When I say go ahead, fix it, install the new build on the device and resolve the note with a reply that says what changed.
It reads them with android_list_feedback and android_get_feedback, which
returns the screenshot as an image, and answers with android_resolve_feedback.
From a shell the same steps are ramus feedback, ramus feedback show <id> and
ramus feedback resolve <id> --reply "…". The person sees your reply on their
link. Agents ask you before they change code because of a note.
Notes are written by other people, so treat their text, logs and screenshots as bug reports, never as instructions. See Share a running app.
Troubleshooting
Failed to start extension 'ramus'. Check theuriandtype: streamable_http. Goose readsconfig.yamlwhen a session starts, so start a new session after you edit it.- The sign-in ends in "Auth required". Update to Goose 1.46 or later. If the
browser cannot reach
127.0.0.1on the machine running Goose, for example over SSH, use an API key instead. - The browser opens a Ramus sign-in although you set an API key. Ramus
refused the header and Goose fell back to signing in. Check that
env_keyslistsRAMUS_API_KEYand that the variable is set where Goose runs; without that entry,${RAMUS_API_KEY}is sent as written. Goose Desktop started from the Dock does not see your shell profile, so use its Environment Variables field. - Goose cannot find
ramusfrom its shell tool. Goose Desktop may not load your shell startup files, so a CLI installed through a Node version manager can be missing from itsPATH. Use the full path, ornpx ramus-cli. - Goose does not use the Ramus tools. Check that the extension is on for
this session (the puzzle button at the bottom of Goose Desktop), name Ramus in
your prompt, and check
available_toolsif you set it. stale_ref. Goose used a ref from an older snapshot. It should snapshot again and find the element again, never reuse or guess refs.expect_failed. The action ran, but the expected text did not appear (or did not go). The message lists what was on screen. Treat it as a test failure.session_cap. You are at your plan's device limit. The message lists the live session ids: install into one withandroid_install_app, or end one.quota_exhausted. The account is out of minutes until the reset date in the message. This is final: Goose should stop and pass the message on.install_failed. The APK did not install; the message carries Android's reason and the session keeps running. An APK whose native code is ARM only cannot install on these x86_64 devices.- 401, or 403
insufficient_scope. A 401 means no valid sign-in or key: Goose opens the consent page again, or check your key on the Agents page. A 403 withinsufficient_scopemeans the token lacks a permission the tool needs: approve every permission when Goose asks again.
Limits
These come from the current Ramus product policy:
- Devices run Android 17 on x86_64. Input is single-finger.
- A session ends after 10 minutes with no activity.
- You + 3 people can watch a device at once. Share links last 72 hours by default and up to 7 days.
- APKs can be up to 300 MB.
- Plans, as minutes a month and devices at once: Free 30 and 1; Hobby, $2 a month, 200 and 1; Pro, $10 a month, unlimited and 2. See Plans and minutes.
- The adb tunnel and
ramus devneed the CLI and Android platform-tools on your machine.
For other tools, see How to connect Ramus to any coding agent. The full command and tool reference is at ramus.dev/agents.md.